Customer Migrations Guide: Migration Process
Process overview: A breakdown of the process so that you know what to expect along the way.
Preparation and Prerequisites: Essential information you need to know before using the API, including authentication methods and datetime formats.
Product Creation Guide: Step-by-step instructions for validating product data and creating products in Kraken, along with expected responses.
Account Import Guide: Step-by-step instructions for validating, creating, and checking, and accounts, along with expected responses.
Post-Import Actions: Instructions for adding or updating information in existing accounts, covering actions like adding financial records or account notes.
Additional Endpoints: Run through of other useful endpoints for retrieving information during the account import process, such as import statuses.
External Events: Information on how to identify external events published by Kraken as part of data migrations.
If you’re new to REST API’s, or you’d just like a quick refresher, check out this page here for a brief explanation of what it is and how it functions, including definitions of key terminology that you will come across throughout the process.
In this section we will explain each stage of the process so you know what to expect along the way.
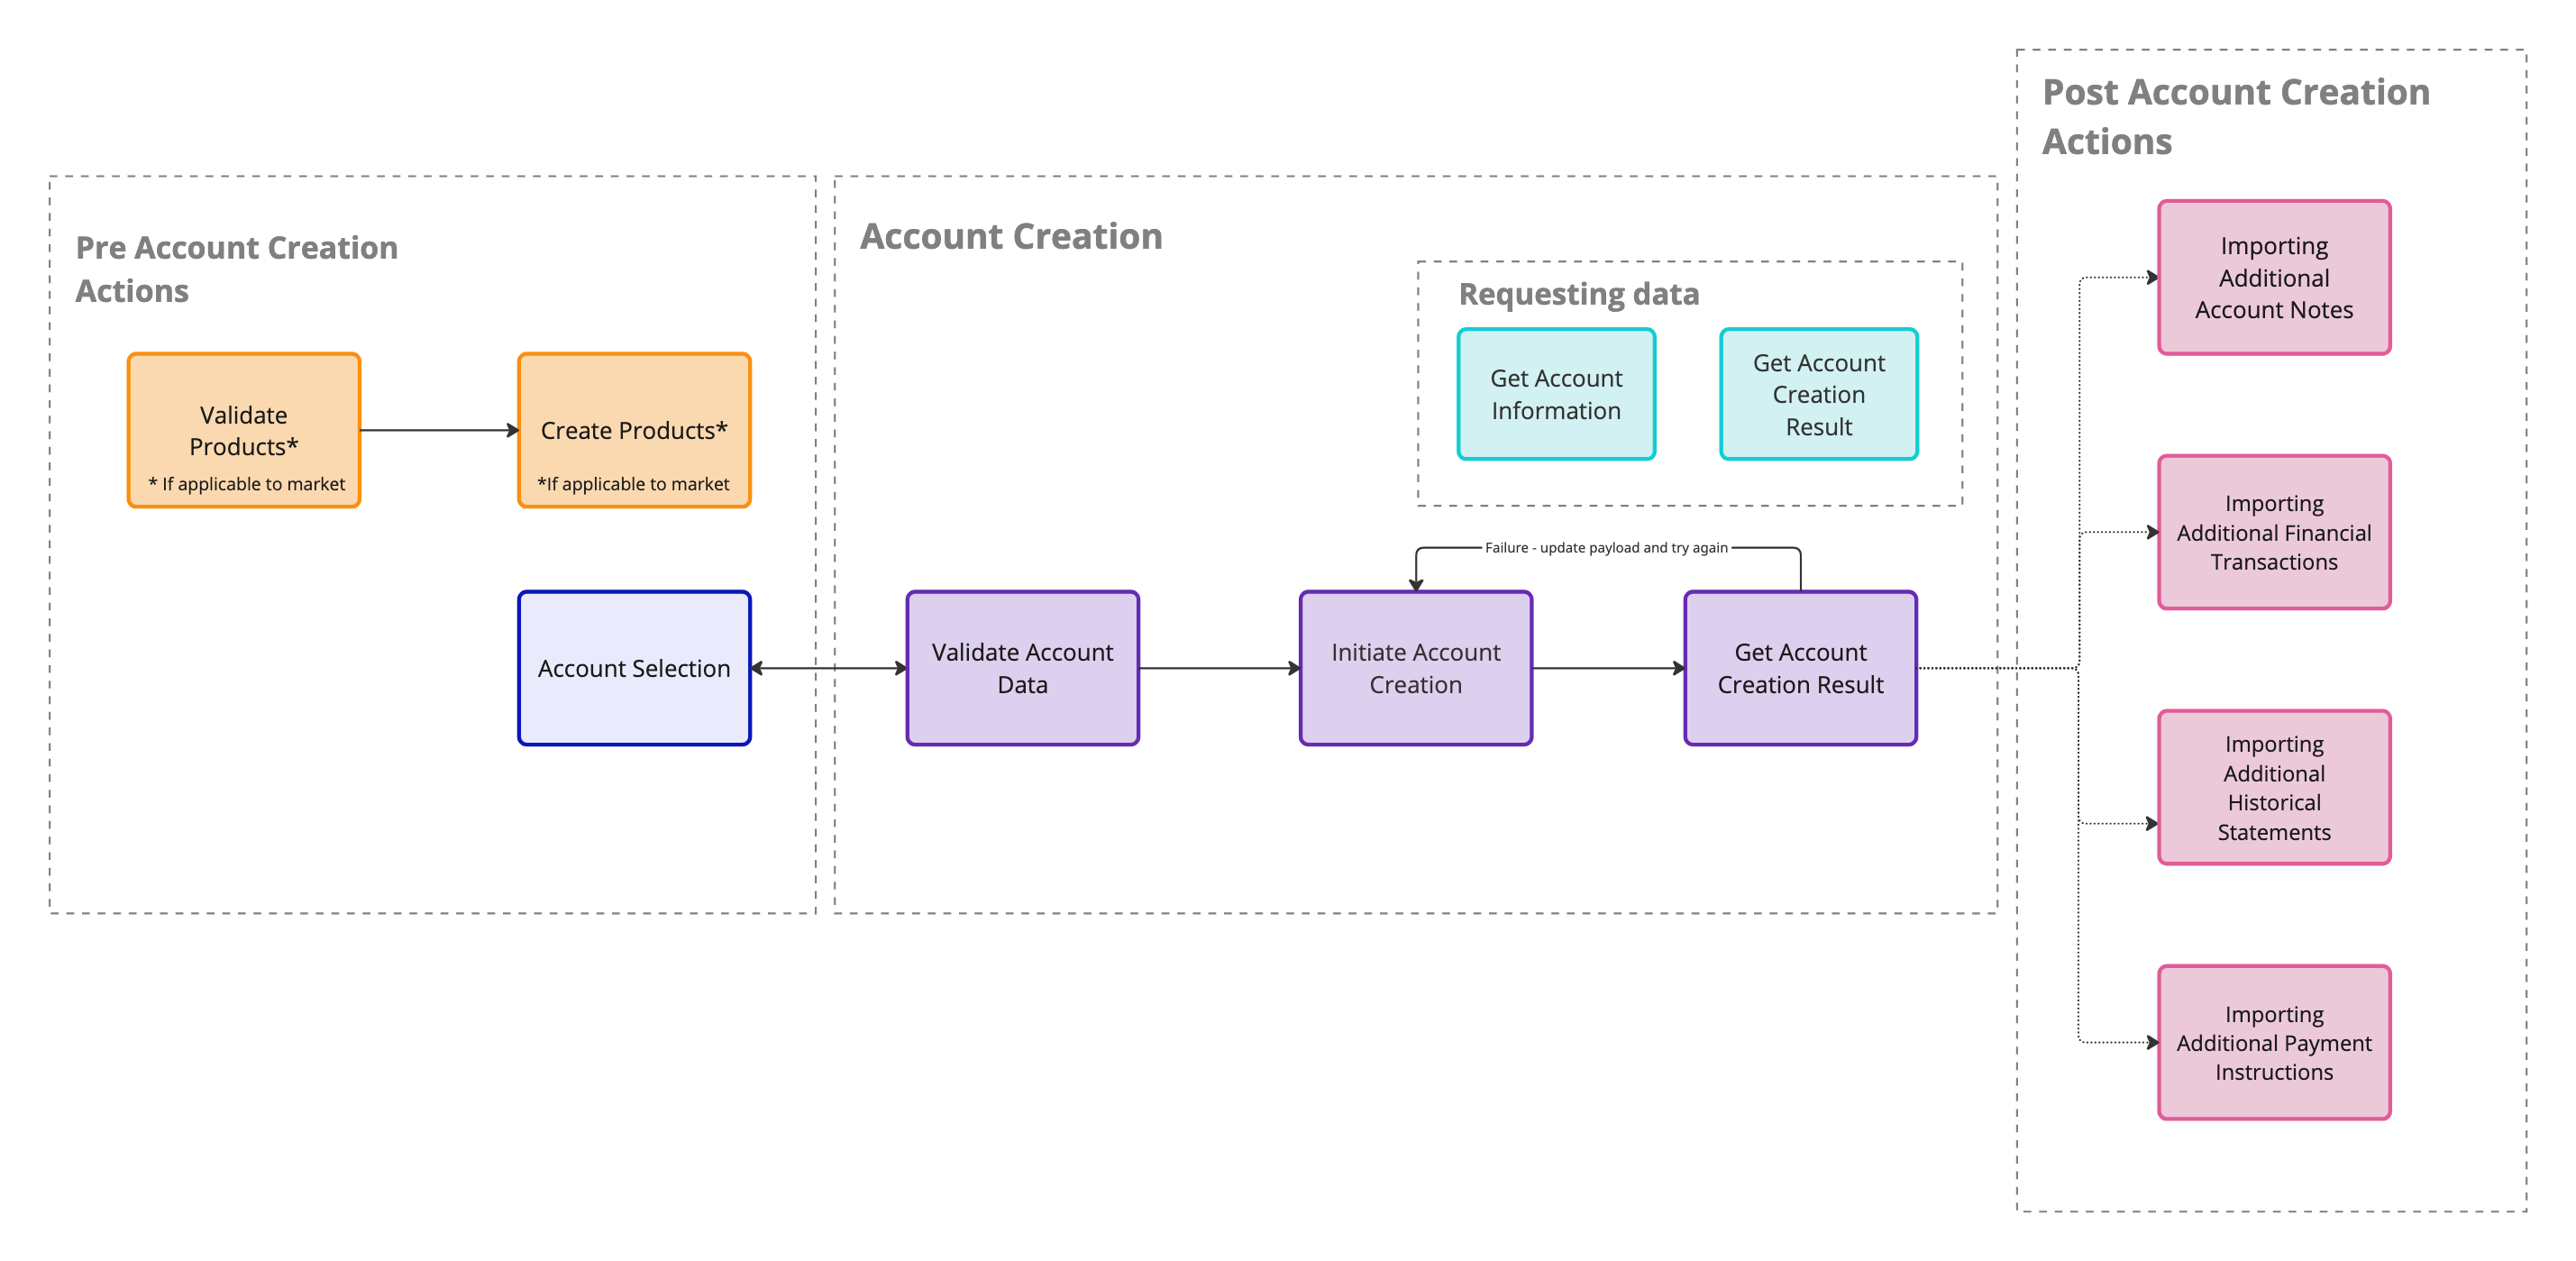
Before using our API, there are a few things you must do in preparation:
Segment into cohorts: First, you must group accounts into cohorts to facilitate the import process. Coordinate with the Kraken team as required.
Prepare the data: Next you must prepare the data for import, aligning it with Kraken's API structure. While you are responsible for this part of the process, we can offer guidance based on past successful implementations. To help you prepare the data, you can refer to the section on validating data where you will find a comprehensive tables containing all field definitions and validation rules necessary for successful import. Make use of this resource to ensure your data is prepared correctly.
Set up an import supplier: You will have at least one import supplier where we group your imported accounts in Kraken. Speak with the Kraken team to determine the suitable configuration. See section on import suppliers for more information.
Once the data is prepared, and before you begin the account migration process, you must create your products in Kraken.
The product creation process is divided into 2 stages, each corresponding to its own endpoint:
Validate product data: first you must ensure that the data is prepared correctly so that it aligns with our API structure.
Create product in Kraken: once the data is validated you can go ahead and create the product within Kraken.
After you’ve prepared the data correctly, coordinated the set-up of an import supplier with us, and created your products in Kraken, it is time to import an account into Kraken.
The process to import an account is divided into 4 steps, each of which has its own endpoint.
Validate: First you must validate the data by calling the validation endpoint. In this step you will be able to check that the data is prepared correctly. If you receive an error response, just refer back to the field definitions table and check that the data has been inputted correctly. Run this endpoint as many times as required until you've received a successful response. This endpoint is synchronous.
Create: Once the data has been successfully validated, you can go ahead and initiate the creation of the account. This endpoint creates the provided accounts asynchronously, so a succesful result does not neccessarily mean that the account has been created. Instead, it means that a job has been scheduled to create the account. If no schedule window period is provided, accounts will be created on a first-come, first-served basis.
Check: With the account being created asynchronously, you will need to ensure that there were no errors during creation. You can use the task ID that was provided in the response of the above step to query the status of the account creation. Alternatively, you can get the status of tasks in bulk instead of looking for a specific task - this is the preferable workflow to use when importing cohorts of accounts
(Optional) Acknowledge Result: After you have checked the results of your account creation, you may want to mark these results as acknowledged. Doing so means that this result will no longer be included in the response when getting the status of tasks in bulk. This functionality is intended to keep the data relevant once an account has succesfully been imported into Kraken and de-activated in the source system.
Additional actions: We offer an additional set of endpoints which might come in handy at different steps throughout the process. The purpose of these endpoints is to retrieve information. See section on Requesting Data for more information.
Once you’ve completed these steps and have successfully created an account in Kraken, there are a number of post-import actions you can take to add additional data to an account that has already been created.
These are:
Add account notes
Add financial transactions
Add historical statments
Add payment instructions
And voilà! By now you should have a clear idea of the process, so let's dive into any prerequisites you should be aware of before you begin.
During the data migration process, Kraken publishes external events to Amazon EventBridge. External systems can subscribe to these events and process them according to their own requirements.
For a complete list of event types and their payloads, refer to the External Events section on the Support Site.
Events published as part of data migrations are tagged with a data-import
metadata tag. External systems can use this metadata tag to apply targeted filtering or
handling logic as needed.